Y'all don't even know how excited I am about my Shibori-dyed napkins. Dinner party, anyone?
True facts about me: I suffer from Public Creating Anxiety. When attending any workshop, craft activity or any adult-art-makerin' of any kind, my stomach muscles tense up, my mouth goes dry and I just can't create anything that doesn't make me wanna cry myself to sleep at night. That doesn't stop me from happily attending any crafty date I get invited to (so, call me, y'all!). I mean, I love learning something new and fun. It's just I'm totally stressed THE.ENTIRE.TIME.
Case in point: the first time I learned Shibori...(back in the day when I made poor choices in footwear)
Me and my buddy Debbie!
Way back in 2007, I was super fortunate enough to travel to Japan as apart of the Japan Fulbright Memorial Fund Teacher Program (I've been campaigning for them to shorten that name for years). If you aren't familiar, it is a program where 200 teachers from all over the U.S. are invited to stay in Japan for nearly 2 weeks. During that time, you are educated about the culture, taken into schools, toted around and even allowed to stay with a host family. I made so many wonderful friends and learned so much. It truly was an experience I wouldn't swap for all the dark chocolate in the world (which is really saying something). At one point during our adventuring, we were taken to Aomori, Japan and a Shibori dying facility. After the tour, we were told that we'd be able to try our hand at this beautiful dying process. Being the only art teacher in the group, all eyeballs were on me and my design. Needless to say, no one was really impressed with my lackluster performance (although, personally, I am more embarrassed by that ensemble. WHAT AM I EVEN WEARING?!)
Needless to say, after that flop nearly 10 years ago, I didn't attempt Shibori again...until a couple weekends ago when my friend Sara had some art teachers over for a Shibori party!
Where I made much better outfit choices but STILL sucked at dying. You can see my dud of a dye hanging on the far left. I was so sad at how my attempts at dying turned out. I mean, how can I stink at tie dye?! I love me some fiber arts, that's my jam. That afternoon, determined to better my dying skills, I ordered a dying kit and a couple books on Shibori. And last weekend, I went NUTS.
And, it's official: I'm in love with Shibori!
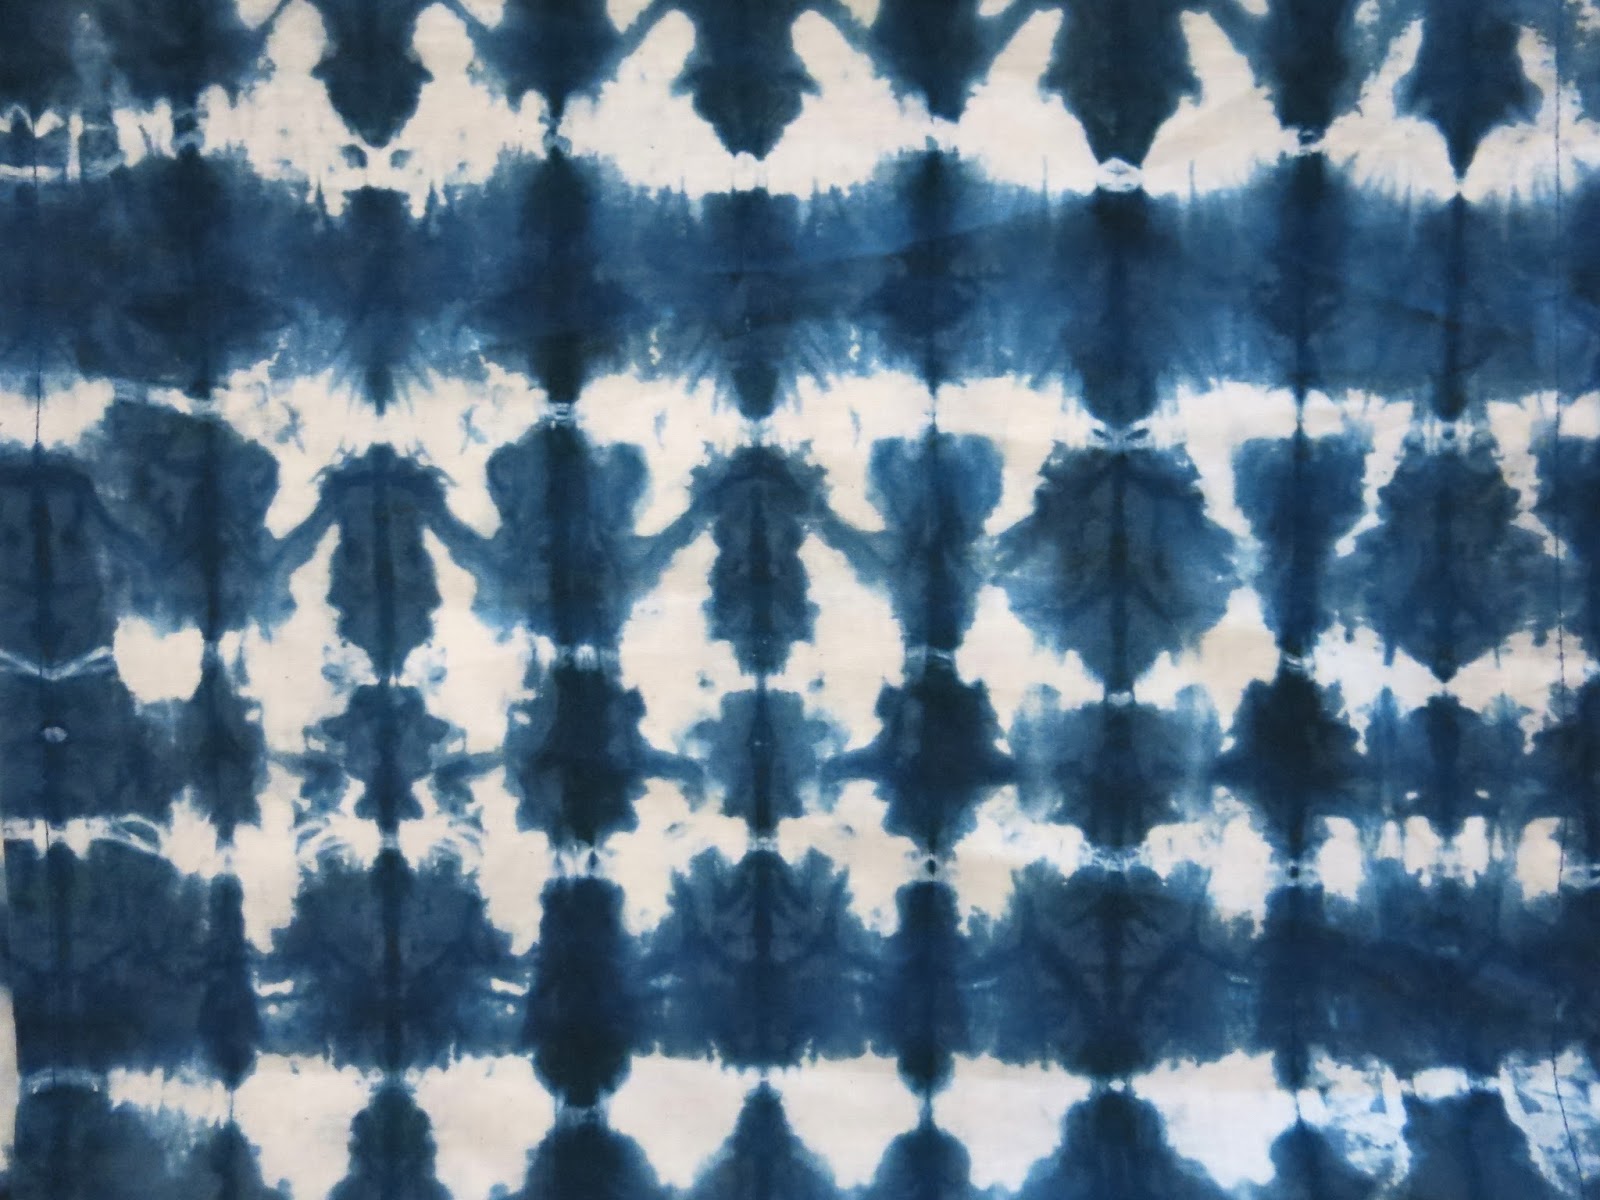
If you wanna give Shibori dying a try, I recommend this kit and purchasing a bolt of muslin (so you can really go to town like I did) and bunches of rubber bands. Be sure to follow the dye mixing directions carefully for best results. If you'd like to learn the techniques I tried, I go thru each and every one of them in this video.
Even if you follow my folding and banding techniques to a T, that doesn't mean they will turn out just like mine. The fun is not knowing what you are gonna get.
Baby Banding: I picked up some of those tiny rubber bands for fine hair at the Dollar Tree. For this look, mark your fabric with a disappearing ink pin where you want your designs to be. Then pinch the fabric just a little and place a rubber band around it, wrapping it several times. If you do that with one rubber band, it will create the circle you see. If you add more rubber bands, one below the other, it will create the larger circles.
Over Dying: If you dye a piece of fabric and you are disappointed by the outcome, don't throw it away. Just try something new and toss it back into the dye bath. For this piece, I first just scrunched the fabric into a ball and banded it. Unfortunately, not enough dye was able to get into the bound areas which left big areas of white. To add more design and color, I placed wooden beads under the fabric and attached them to the fabric with rubber bands. I threw that back into the dye bath. Once the rubber bands and beads were removed, they left behind those beautiful floral designs.
Paperclip Dying: This one was super easy. Just accordion fold the fabric and bind it with paperclips. You can see the halos of the clips on the top and the bottom.
Wooden Block Dying: The kit I mentioned comes with directions and suggestions for dying. One was this method. To achieve this look, accordion fold the fabric. Then triangle fold the fabric (see video). Once complete, add a block of wood to either side of the triangle and bind with rubber bands. The dye only manages to seep into the outer edges of the fabric.
Diagonal Fold: Instead of starting your accordion fold at the bottom, try something different by starting at one of the orders of your fabric. Once finished, add rubber bands every 2" for this kind of look.
Accordion Fold: Same method as above...but start the fold on the side instead of the corner.
Faded Look: This was one of my first pieces. I tried the wad-it-up-and-band-it method and it was a dud as it left me with large areas of white. So I just threw it in the dye bath for a moment and it added the really beautiful light blue color. Now it's one of my faves.
And then I completely lost my mind and started dying everything from wool yarn that I bound with rubber bands.
To wooden beads that I bound with the baby bands.
And wooden bangles that I wrapped in rubber bands (my new fave!).
And, um, my hands. You might have noticed that my finger nails, which I NEVER paint, are currently painted blue. That's to hide the fact that they are indeed blue.
So what does one do with a dozen pieces of Shibori dyed muslin? Make napkins, of course! I simply hemmed the edges and they were done. I scored those napkin rings on the cheap via Amazon.
This calls for a dinner party! It's a shame that I don't cook.
Perhaps I'll just host an "Admire my Shibori Napkins" Party. I wonder if anyone would show up.
Regardless, I'm loving how the indigo blue goes with my dining room...and now I can say that I can Shibori dye! I can't wait until the weekend to do it some more, I'm totally addicted.
P.S. I attended another craft night on Wednesday hosted by my good friend Tamara...and was again struck by Project Creating Anxiety. Tell me I'm not alone in this! Looks like I'll be working on that craft this weekend and attempting to perfect it as well.
I love these! I am so glad I am not the only one who has the project creating anxiety. This hapenned to me as well and I thought I was losing my mind! I wonder if it's because of the time factor...when we create in our own spaces we don't have the time restrictions we would at a craft night party that is only 3 hours... now I want to try these dye kits!
I DEF think it has something to do with the time factor!! I literally clinch up whenever I create in front of others. Shoot, this weekend, when I was painting, I had the same experience! I have had to find ways to work around it...like work on three paintings at once or purposely wreck a work of art to not become so attached. I don't feel this stress with other crafts like sewing or needle felting. Something I need to work on! Glad to know I'm not alone!
Goodness, I didn't even recognise you. (I will not show pictures of me in 2007...lol) Though I find your second attempt really good, tbh. I would hang that on my wall. I can't really see myself wearing shibori, (though I can see you wearing it) so I didn't really get on the trend, till I saw it as pillows and wall hangings recently.Even my spartanic-decor husband liked the look.
I had creation anxiety in school, but that was because we had this one guy who was perfect and creative at every craft and art. It made my attempts look high-schools level, and kind of made me dissatisfied with myself. I think its a sense of competition that always kills my creativity. Maybe a sense of making for yourself rather than to show off would ease your anxiety?
Haha! Yes, I know! When I show pictures like that to my students they are all, "who is THAT?!" Just me in glasses and bad clothing, kids! Ugh, the perfectionist. Nothing will make everyone feel inadequate faster!
So I was looking through your pictures this morning and I think you were in Japan with my neighbor! The guy on the far left ( won't use his complete name) looks like Rich W. from Edwardsville, IL. Do you remember him? If not it could be his twin. My first day back is Monday. I am looking forward to a great year!! Love you blog!!!
Hi! I THINK that might have been his name but it has been so long! He was a delightful guy, so funny and sweet! If that is him, I had no idea he was a twin. Have a great first day back!
This is awesome-sauce! Also so funny to me, because the first time I tried this was at an art conference and my design was by far the most boring, which is why I didn't take it home and intoy classroom. However, you're giving me new hope! �� How many kits do you feel would be necessary for one class of say 28 students? From one Art teacher Cassie to another... Thanks! Cassie M.
I love it that you dyed your hands! Exactly something I would do...because when you are in it you are IN it! And who could be bothered to worry about that when there is stuff to be figured out?!
I swear I wore gloves...but they were those short gloves and the kit only came with one pair. So, in the midst of taking them on and off, they got a hole in them and I was just like, eh, who cares?! Well..I don't recommend it. That was a drag to scrub off!
Cassie, you crack me up Girl!!!! I 100% have the same anxiety issue, and has not gone away in my 38 years on this earth. That must be the pressure of being an art teacher I guess, or that's what I tell myself anyway!! I am loving the Shibori, which totally reminds me of West African Mud Cloth. I was able to see the process first hand during my stint in the Peace Corps, speaking of, you are totally dressed like a PC Volunteer, LOVE IT!! Thanks for sharing the technique, I've been looking for new cultural art forms to show my students, so a huge THANKS!! PS, how long before the dye came off your hands??
So glad to know I'm not the only one!! IT TOOK FOREVER TO COME OFF! In fact, I resorted to painting my nails a sparkly blue to hide the fact that they are, indeed, BLUE ;)
I'm soo stoked about this! It ties perfectly into my Asian art theme this school year! And my Dad give me two huge bolts of muslin awhile back that I've been cluelessly holding onto! BTW-You don't have to cook to have your dinner party! Pick up some wine and tell everyone it's potluck!-M3


I love these! I am so glad I am not the only one who has the project creating anxiety. This hapenned to me as well and I thought I was losing my mind! I wonder if it's because of the time factor...when we create in our own spaces we don't have the time restrictions we would at a craft night party that is only 3 hours... now I want to try these dye kits!
ReplyDeleteI DEF think it has something to do with the time factor!! I literally clinch up whenever I create in front of others. Shoot, this weekend, when I was painting, I had the same experience! I have had to find ways to work around it...like work on three paintings at once or purposely wreck a work of art to not become so attached. I don't feel this stress with other crafts like sewing or needle felting. Something I need to work on! Glad to know I'm not alone!
DeleteGoodness, I didn't even recognise you. (I will not show pictures of me in 2007...lol)
ReplyDeleteThough I find your second attempt really good, tbh. I would hang that on my wall. I can't really see myself wearing shibori, (though I can see you wearing it) so I didn't really get on the trend, till I saw it as pillows and wall hangings recently.Even my spartanic-decor husband liked the look.
I had creation anxiety in school, but that was because we had this one guy who was perfect and creative at every craft and art. It made my attempts look high-schools level, and kind of made me dissatisfied with myself. I think its a sense of competition that always kills my creativity. Maybe a sense of making for yourself rather than to show off would ease your anxiety?
Haha! Yes, I know! When I show pictures like that to my students they are all, "who is THAT?!" Just me in glasses and bad clothing, kids! Ugh, the perfectionist. Nothing will make everyone feel inadequate faster!
DeleteI feel the same way when I am with my creative peers. Your posting was amazing and inspiring.
ReplyDeleteThank you so much for your kind words!!
DeleteSo I was looking through your pictures this morning and I think you were in Japan with my neighbor! The guy on the far left ( won't use his complete name) looks like Rich W. from Edwardsville, IL. Do you remember him? If not it could be his twin. My first day back is Monday. I am looking forward to a great year!! Love you blog!!!
ReplyDeleteHi! I THINK that might have been his name but it has been so long! He was a delightful guy, so funny and sweet! If that is him, I had no idea he was a twin. Have a great first day back!
DeleteThis is awesome-sauce! Also so funny to me, because the first time I tried this was at an art conference and my design was by far the most boring, which is why I didn't take it home and intoy classroom. However, you're giving me new hope! �� How many kits do you feel would be necessary for one class of say 28 students? From one Art teacher Cassie to another... Thanks! Cassie M.
ReplyDeleteHello Cassie! The box says that it can dye up to 15 shirts...so my guess would be 2 boxes would be plenty! Have fun!!
DeleteI love it that you dyed your hands! Exactly something I would do...because when you are in it you are IN it! And who could be bothered to worry about that when there is stuff to be figured out?!
ReplyDeleteI swear I wore gloves...but they were those short gloves and the kit only came with one pair. So, in the midst of taking them on and off, they got a hole in them and I was just like, eh, who cares?! Well..I don't recommend it. That was a drag to scrub off!
DeleteCassie, you crack me up Girl!!!! I 100% have the same anxiety issue, and has not gone away in my 38 years on this earth. That must be the pressure of being an art teacher I guess, or that's what I tell myself anyway!! I am loving the Shibori, which totally reminds me of West African Mud Cloth. I was able to see the process first hand during my stint in the Peace Corps, speaking of, you are totally dressed like a PC Volunteer, LOVE IT!! Thanks for sharing the technique, I've been looking for new cultural art forms to show my students, so a huge THANKS!! PS, how long before the dye came off your hands??
ReplyDeleteSo glad to know I'm not the only one!! IT TOOK FOREVER TO COME OFF! In fact, I resorted to painting my nails a sparkly blue to hide the fact that they are, indeed, BLUE ;)
DeleteThis looks like so much fun! I wonder if the dye on the beads and bracelets will come off on your skin or clothing...?
ReplyDeleteWe'll see!! I'll report back ;)
DeleteI'm soo stoked about this! It ties perfectly into my Asian art theme this school year! And my Dad give me two huge bolts of muslin awhile back that I've been cluelessly holding onto! BTW-You don't have to cook to have your dinner party! Pick up some wine and tell everyone it's potluck!-M3
ReplyDeletePERFECT!! AND I totally dig your idea of a dinner party. So gonna do it!!
DeleteYou are not alone in the PCA. I feel it when I attend sessions that are for "Creation" too!
ReplyDeleteThank goodness! We need to have a PCA craft night. We can all be stressed together ;)
DeleteThe "faded look" one is so beautiful!!!!!! Also: where did you get those yellow chairs?!
ReplyDeleteThank you! I got the chairs last summer via Overstock.com...all four were about $200 with shipping. I love 'em!
DeleteLove this so much. I am thinking I need to make this happen this weekend!
ReplyDeleteI made some similar too. Nice work. diy dye
ReplyDelete