Showing posts with label art projects for kids. Show all posts

Sunday, May 3, 2020

Snack-tastic Chefs Week!

Who is ready for another week of art-making! I'm pretty stoked about this week as it is based on my favorite thing: snacks! And, despite the fact that I'm not such a great chef myself (have you even seen Season 3, Episode 3 of Nailed It!?), we are going to be BAKING COOKIES on Friday! Which is all kinds of funny as the judges spit out my cookie that I made on T.V. Let's just hope y'all don't do the same. 

So get read for another fun week and be sure and share this with friends and family so they can join the fun too. We'll kick things off with a Chef Selfie!
On Tuesday, I'll be sharing a lot of paper folding and paper sculpture techniques in this Hamburger Sculpture project. 
 On Wednesday, let's make a Salt Dough Pizza! 
On Thursday, I'll show you how to draw a 3-D cake! It's a piece of cake! 
And on Friday, we are gonna bake! I'm so excited about this!

To join me live, you can find me on my Instagram and my Facebook page. If you miss the LIVE session, no worries. You can catch the video the next day on my YouTube channel! Be sure and subscribe. I'll be sharing lessons there (in addition to these) all week for Mother's Day! 
See you real soon!
 photo signature_zpsd10b3273.png
Read more »

Wednesday, April 15, 2020

Dinosaur Week: Pop-Up Dino Eggs!

 Dinosaur Week is underway and yesterday we had so much fun creating these Pop-Up Dino Eggs! If you missed out, don't worry. Just grab these supplies and follow along with me!
 Here's the video!
Want to join the fun today? We'd love to have you. We're going on a Dino Dig! Here's what we're using:
You can join the LIVE art class on my Instagram, my Facebook or catch it afterward on my YouTube channel. New videos added all the time so be sure to subscribe!
 photo signature_zpsd10b3273.png
Read more »

Friday, March 13, 2020

My Favorite Lessons for Home-Based Art Education!

Hey, y'all! I'm about to share some of my fave home-based learning projects but...this is just the tip of the iceberg! I have a TON of art lesssons on my YouTube channel for you and your artists to explore. Be sure and subscribe as I'll be adding many more!

Currently, we as educators find ourselves in the most unusual of situations: away from our students for an unforeseeable amount of time and wanting to still connect, teach and create. If you are like me then your district has requested that you attempt to do just that with home-based learning. Because this is unchartered territory, the idea of teaching remotely is confusing, daunting and overwhelming. Where to even start? 
I've been putting some serious thought into this topic for the last couple of days as I create fun art activities for my students to do at home. I'll be sharing them all right here (for free, of course!) but in the meantime, I wanted to share with you the home-based art lessons I plan to use. Each of these lessons, videos and PDFs are FREE for you and your students can use right now. Feel free to include in your take-home packets or modify to fit your student's needs. Let's begin with this Monochromatic Self-Portrait lesson that is appropriate for kindergarten on up!
Just click for the video! Because many students may not have markers at home, you might suggest crayons for them to add color. 
This Colorful Village lesson was one that all of my students loved! I did it with my first through fourth graders and it was a huge hit. In case students don't have paint at home, markers and crayons can be used. Without those supplies, this could simply be a great drawing task for them to work on creating three-dimensional buildings. Here's the video:
These colorful houses were so fun to create!
My fourth graders always loved this Romero Britto-inspired self-portrait project. I do think that younger children would love it too. 
Again, consider suggesting students swap out supplies used for what they have on hand at home.
Chris Uphues is easily my student's favorite artist! And can you blame them for loving him so much, his work is just so full of joy! You can check out the entire lesson here. 
The link to this blog post also includes free downloadable PDFs!
Introduce your students to both James Rizzi and Vincent van Gogh with this fun lesson. Click the link for free handouts! Here's the video:
Of course, if you want to get kids creating, then you could always have them create their own sketchbook! I plan to create a video to show kids how to create one easily. In the meantime, they could use the Sketchbook Decoder Sheets found here to personalize their sketchbooks! 
If these look kinda familiar, we have done a similar project with my Getting to Know You sculptures. That project is also one that could be done at home with improvised materials!
Times like these could get you down...but we can't let it! So why not have students create drawings of people, places and things that they are grateful for? Click here for two free PDFs!
If you are required to send home a packet as we were in my district, you might consider downloading and printing out this sheet and including a circle sticker. These can be found at the dollar store. Children could access a telling of The Dot on YouTube and create their own work of art in the frame!
If your students have access to paper, scissors and glue, this easy Greg Mike-inspired project would be a blast for them! 
Without access to construction paper, students could simply use the paper that they have on hand.
A lesson that is always a hit with my students is making this pop-out star. They love creating the patterns and then writing about themselves. Again, think of an alternative set of supplies for students to use so they can create at home.
Alright, y'all! Stay tuned as I have much more to come. I hope that gives you and all the young artists out there a fun place to start!

 photo signature_zpsd10b3273.png
Read more »

Sunday, May 5, 2019

Fifth Annual Chalked Ceiling Tile Event!

This year marks our fifth to do the chalked ceiling tiles with second grade. I can't believe it's been five years...and I'm happy to say that this year's was by far the easiest and least stressful. I guess I've finally learn a thing or two after all these years! 

In case you aren't familiar with this project that we do, it's a legacy piece that my second grade students create on the back side of a ceiling tile. We use chalk and have a different theme each year. This year, we created tigers because we are the Johnson Tigers!

I always get a ton of questions when I share this project on my social media platforms. I thought I'd try and answer them here and also share the last four legacy projects we've created. Be sure and click on the link as many have instructional videos!
Why do you use chalk and not paint? We use chalk because of the history of how we came to doing these tiles. You see, this was an accidental project. Initially, we were going to do a sidewalk chalk project with a visiting artist (more here). But on the day of the event, thunderstorms were predicted. I was at a loss of what we would do until I remembered that my principal had been asking me to have our students decorate ceiling tiles. So I got one and drew on it with the chalk...we had all the chalk prepped and ready for the sidewalk chalk event, so I was determined to use it. The problem was, the chalk didn't work well on the front of the tile. So I flipped it over and, what do you know, it worked perfectly...just like a sidewalk. And that's how the whole thing got started. 
Why do you use the back and not the front? I found the front didn't take to the chalk as well...but the back is perfect. There are numbers on the back but the chalk covers it up.
What brand of chalk do you use? Doesn't it get everywhere? I really like Faber-Castell chalk and Sargent chalk. We do a lot of coloring with the side of the chalk, not holding it like a crayon. This helps fill in large spaces. These two brands make very vibrant chalk colors. Yes, it's super messy...especially since we work on the floor. I tell the kids to wear their play clothes and come ready to make a mess. But, honestly, look at that floor! It's not even that bad. Having a paper banner under their work really helps.
So...how does this work? How do you teach this? On the day of the event, I have all of my second grade classes come to the multipurpose room. I lead all of then in this activity. I don't ask for additional help or teachers to be in the room...I'm kind of a solo act. This year, I did things in a way that I think worked the best: I had my classes all in rows, by class. Each had an assigned spot to cut down on any behavioral issues. Then I lead them, guided drawing style, in the creation of their own unique tiger. It took us an hour and a half. I happened to have a plan period so this worked out well and my other classes still had their art time.
How do you seal the chalked piece when it's finished? I just use hairspray. Yes, some of the chalk smears when it's placed in the ceiling...but not enough to tell. 
Do you do a different theme for the chalked drawing every year? If so, how do you decide what to do? Yes, I do a different theme. It's sometimes based on what the kids are learning about (butterflies) or I also take requests. For example, the cafeteria manager wanted healthy foods, so last year we created fruit tiles. This year, we did tigers as that's our mascot. 
What will you do when you run out of ceiling space? Retire.

Below is a sampling of what the kids have created over the last 5 years...the links have videos too, including clips of the set up and kids working if you are interested.
But first, I thought I'd take you down memory lane so you can see all the tiles my students have created over the years. Let's start with the very first one, which you can read all about here
The second year, we created these flowers. For this demo, I created a video. You can see how I went about doing this lesson with four classes in previous years here. 
Our third year, we created these geometric patterned fish! Prior to this, we did a lesson inspired by Sandra Silberzweig and created these fun black glue and chalk fish
Last year, we did fruit! These are in our cafeteria and I just love them. More details here!
Let me tell you this: it's a bit of prep, a lot of chalk dust, a crazy mob of children...BUT WORTH IT! The big undertakings always are, right? 

 photo signature_zpsd10b3273.png
Read more »

Monday, November 12, 2018

What the Art Teacher Wore #209

Hey, Pencil Dress! You can find out all the details of this dress, including where I scored the fab fabric right here

HOW DID IT HAPPEN THAT IT IS NOVEMBER ALREADY?! Like, who allowed that to happen? Who gave this year permission to fly by at the speed of light leaving me behind on all things! Y'all I know I say this all the time but MY HEAD IS JUST BARELY ABOVE WATER...maybe it's because...well, I'm in the midst of finishing my SECOND BOOK
Sweater from Urban Outfitters, skirt by me, details here

That's right! This one is the same format as my Clay Lab book but it will be all fibers. Coming up with over 50 fibers projects for kids has been a feat. Y'all know that I love to teach fibers and have been doing sewing, weaving, felting and more with my kids forever...but coming up with even more projects has basically fried my brain. It was a small brain to start with. And now it's basically burnt to a crisp. 
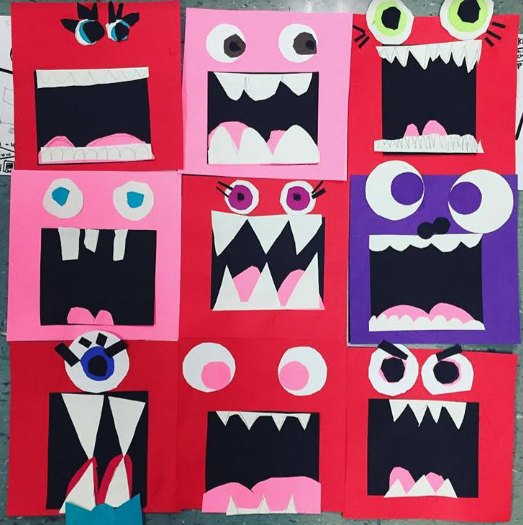
And I feel bad because I know I've missed out on sharing so much here, on this blog. This is such a fun place for me to share lessons, what I'm wearing and what I'm creating...but I've had to give up some of that to push on with the book. I know I'll be happy in the end (like, when I'm DONE!) but right now, it kinda bums me out that this space has been neglected. I'm sorry! More videos and posts to come. By the way, these Loud Mouths were created by my KINDERGARTENERS and you can find the video lesson here
Found this old photo of me back in '81, totally rockin' the teacher bun! AND kinda lookin' like a hostess from Shoney's. 

I've also been busy hitting fall state conferences! Last month I went to Florida's conference where I was one of the keynote speakers and presenters...y'all. It was such a blast! Florida knows how to conference! I'm excited to be heading to Connecticut this weekend to speak and present there too! 
I've also been getting ready for our Artome Art Show! I'm doing a new lesson with my fourth graders this year and I'm so excited about the results. I will DEF be sharing this lesson with you as it was one that the kids and I really enjoyed. 
Crayon sweater needle felted by me, details here!

Also...it seems that I don't often share that I have a podcast so I'm just gonna throw this out there as a reminder! A new podcast airs each Thursday and I'd love it if you gave it a listen. Also, if you have any suggestions for podcast topics, I'm always open. Feel free to drop me a line in the comments.  
After saying all that...I guess I can see why I feel like my head is just above water! In other news, check out these cute suns that my kindergarten created...it inspired one of my fourth graders to stitch up this sun pillow during her recess/stitching time. Isn't it the cutest?
The suns were created for these cuties. I'll be sure to share this kindergarten lesson with you soon!
I hope y'all have a wonderful upcoming week! Check out my pencil dress here
 photo signature_zpsd10b3273.png
Read more »

Sunday, October 14, 2018

What the Art Teacher Wore #208

 This past week was our book fair and to celebrate, we had dress up days! The theme of the book fair was Enchanted Forrest and our first day was to dress in red and white for a mushroom theme. Y'all know I totally had a dress for that, right? I cannot believe I stitched it up way back in 2012! It was the one and only keyhole dress I've made. That Michael Miller gnome fabric is still my fave. Details here. 
Just a little clip of me turning my kindergarten into color mixing wizards. No bid deal.
Do y'all remember that PD I lead at the start of the school year for the faculty and staff at my school? We created a piece that stated our "why we are here". Well, my FAVORITE FUNDRAISER Artome Art Shows was kind enough to donate frames for each one of these WHY's. They now hang outside of each teacher's classroom and look simply stunning. 
 Aside from dress up days, we had a full week of art making AND open house. Which meant we had to make stuff and keep the art room on the tidy side which is a stretch. I'm super good at making messes (and I believe that's rubbed off on my kiddos) but not great at keeping the space clean. So I tidied like crazy on Monday afternoon and we had a stern "don't even think about messing this up!" chat on Tuesday before the night's events. 
Oh, and speaking of Artome Art Shows, we are having ours this December. Which means most of my classes are rockin' on their projects. We always do self portraits of some kind for Artome and this one is my favorite. We start with black glue...and you can find the complete lesson (with video!) here
 Tuesday's dress up theme was fairy or gnome...so I decided to go as Roy G. Biv and surprise the kids. When not wearing a beard and a rainbow hat, I was super comfy in my overalls. I THINK I'M ADDICTED TO OVERALLS. These bad boys are from Forever 21. 
Just a lil Roy action here. 
 Of course, when Roy G. Biv visits, we draw his likeness! Kindergarten did a super job of following along with Roy...
And coloring these cuties in.
 Wednesday was Wacky Sock day. I scored these from a shop in the mall that only sells socks...and they have the best selection. I don't own too many fun socks (surprising, I know) but when I spotted these, I had to have them. 
 My Unicorns are Real top is from Five Below...which is my guilty pleasure. Well, that and Dollar Tree. And in my neck of the woods, they are next to each other which means they are SUPER DANGEROUS. 
 For this year's open house, I made sure to hang two pieces of art for every kiddo. It was a lot of work and I'm excited to see it decorating the halls. I brought back my tree weaving lesson this year with third grade and I'm so glad I did. More details on this project soon. 
Usually my fourth graders do this project for the Artome Art Show but this year, I'm changing it up a bit. For our first day, we sketched thumbnail self portraits and then began creating these with bingo daubers on 9 X 12 paper. I'm so excited to see this project progress. 
 Words on a shirt day was the dress up theme for Thursday. I also had Round 2 of dressing up as Roy G. Biv for my classes that had missed out...so that meant pants again. TWICE IN ONE WEEK! Kinda crazy, I know. 
 My first graders are the kings and queens of cute with the start of their self portraits. You can check out lesson details here
 Friday was a half day but I had a stacked morning with five classes, kindergarten through fourth. I know my paint trays have just about run their course but were still pretty full of paint. So we did a collaborative circle painting and had a blast. All classes painted on the paper on their tables. They could only build upon the paintings that were there, not paint over them. It was a great way to spend our last day before break.
 And now it's fall break time! 
We have a lovely week off...it's glorious! I'll be home most of the week but on Thursday, I'm off to Florida for their art teacher convention...and I'm so excited. See y'all soon!
 photo signature_zpsd10b3273.png
Read more »