Showing posts with label elements of art. Show all posts

Tuesday, November 1, 2022

Exploring with Shapes: Shape Centers in the Art Room

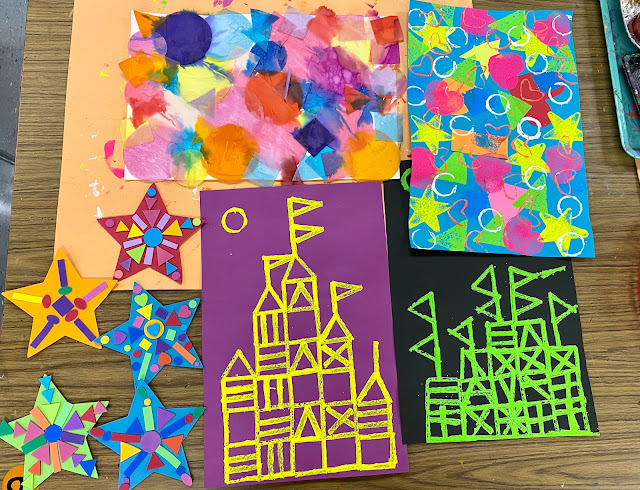
Hey there! Not too long ago I shared that I have been creating art-makin' centers or stations or whatever you wanna call them for my students. So far, we've made it through the Line Stations and have recently been using the papers there to create works of art. Now that we've wrapped up that (and the kids loved it so much I assumed it was a hit), we are ready to move on to shape! Here is a look at what my 2nd through 4th grade stations look like:
These stations are a little longer than the line making ones. So, for my 30 minute classes, students will get to MAYBE two stations before moving on. I'm keeping the format of them changing stations more open: if they are finished, they are to tidy their area, put away their artwork (with name on it, pretty please!) and move on to any station with an open seat. 

Just like the papers created with the Line Stations, these are just the starting point of our project. Each grade will create something different with their shape explorations. I've been sharing what my students created with their papers, you can check it out on my Instagram. Details to come, I promise!
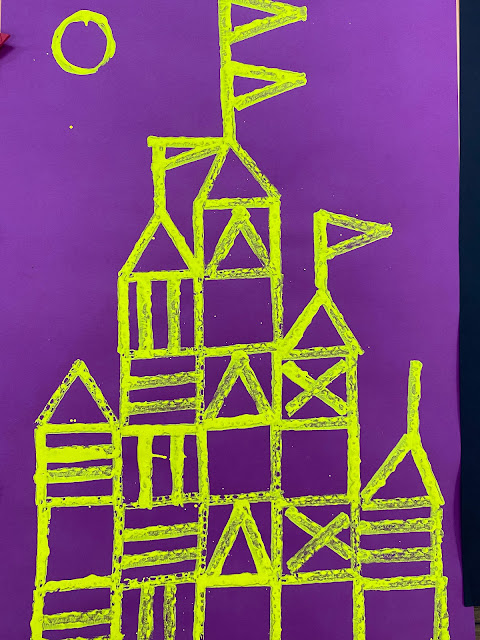
In these centers, students will focus on geometric shapes. We will learn more about organic shapes soon. Cardboard printing expanded from line making to creating castles in this station. I can't wait for students to work on these later in class.

Students will explore cutting geometric shapes as well as printing them in this station.

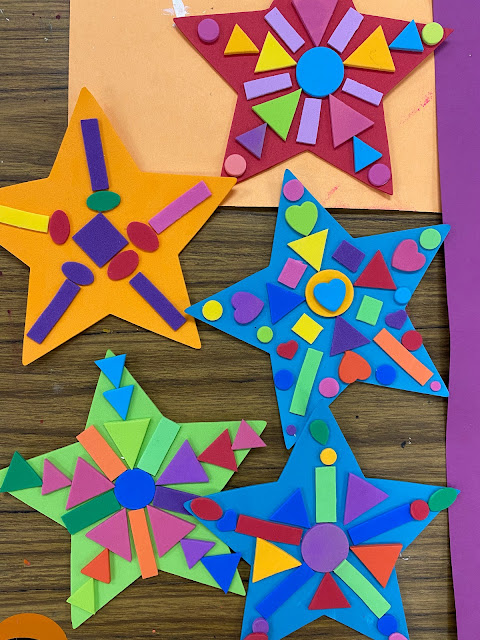
Students learned about radial symmetry in this station. I had foam stars on hand...but may use different shapes with other grades. I'll keep ya posted! I'm excited how these turned out!


I have a ton of bleeding tissue paper shapes that we are creating a design with in this last station. I have plans for these...stay tuned!
Since my kindergarten and first graders are working on something else, I'm glad I have an empty table to pile everything on. It's...a lot to keep up with but the kids are having a blast and that's all that matters. 


photo signature_zpsd10b3273.png
Read more »

Wednesday, October 19, 2022

Creating Lines with Modeling Clay

I recently shared that I created line-making stations for all of my students. You can check out a video and blog post on that here. While I was out, I created this video and sheet as a sub plan for all grades. I've since decided to add it to my early finisher centers! Check out the video I created for the kids here:

And here's how I plan to use it as an earlier finisher center. The kids loved working with it while I was away so this should be a fun activity choice for them!


photo signature_zpsd10b3273.png
Read more »

Sunday, September 25, 2022

Creating Line-Making Stations in the Art Room

Hi! I shared earlier this week that all of my students, kindergarten through fourth would be doing line-making stations for 2, 30 minute art classes as an introduction for some and a review for most. I created a short video to walk them through each station and you can check it out here to see what we were up to:

On my Instagram, I got some questions about where I got the line spinner and the other resources I used...I made them! And it was so easy, I thought I'd show you how I did it in case you are interested. So here's the how-to video:

I've already decided what each grade level will do with their collection of line-making papers and I'll share soon. In the meantime, I'm already thinking of ways to expand on this idea of stations. The kids are loving it and it really helps with the wiggles. We have the need to move and this helps. Although a balance of calm days will definitely be sprinkled into the mix! 
Because my students do stations in PE, this concept was something they easily understood. Honestly, the only thing holding me back on doing this sooner was...me! I'm not great with change but this year, I am excited to try all sorts of new things. It's helping me get outta of my burnout that I was experiencing since 2020.
I think that's one of the reasons I slowed down so much on blogging this last year: I just felt stale. I'm feeling excited now...and I think the kids are too.
Anyway, I just wanted to share how we created these centers in case you are interested. I hope you have a relaxing weekend!


photo signature_zpsd10b3273.png
Read more »

Wednesday, February 13, 2019

In the Art Room: Kindergarten Hearts!

Not long ago, I was at Dollar Tree and found these foam heart shapes. I got an idea to use them in conjunction with the book, The Shape of my Heart with my kindergarten friends. I've ALWAYS wanted to do a project inspired by this book but I just couldn't think of a way to make it work...then, I got the idea to use foam shapes and pull prints. We've been doing it all week and we are loving it. I made a process video for you and your kiddos!
I see my kindergarten for 30 minutes, twice a week. On the first day, we used foam shape stickers purchased at Michaels to fill our hearts. We read the book and chatted about the difference between organic and geometric shapes. 
The following day we were ready to print! A friend on Instagram suggested that I use foam rollers and tempera paint for the printing portion...here is a peek at our table set up:
And here's a look-see at our prints!
Don't you love them!? Each kiddo pulled two prints. Next week, we'll begin cutting them out and adding them to our dotted backgrounds. Details about that in the video.

Now, what to do with our heart printing plates? Well...check out that first image and be sure to watch the video! I'm so excited, we'll be making metal reliefs with them. I did not explain the process of how we will frame those metal hearts in the video as I'm still working that through. I'll keep you posted tho. Have fun with this lesson...I know we have been!
 photo signature_zpsd10b3273.png
Read more »

Tuesday, May 2, 2017

In the Art Room: Chalked Fish Ceiling Tile

Y'all...it's getting down to the wire and I'm all about the last minute at this point in the school year. Between our art show, clay week(s), a ceramic mural undertaking (stay tuned!), our annual 2nd grade ceiling tile project just kinda slipped my mind. Not until a teacher asked did I remember that it was that time of year. After a mishap with a chalk order from China (they sent me HAIR CHALK, y'all!), I reached out to my friends at Faber-Castell and they sent us the most beautiful chalk I have ever seen. Last week, I sorted the chalk, created the following video and today, in just under 2 hours, my 65 second graders created magic!
The video so saved my voice! It's a loud room with lots of echos...I know that I would have struggled to keep my voice going and my patience in check. It was just me, one parent and a handful of super helpful 4th grade girls to assist these four classes of kiddos. The kids did wonderfully! I am so super proud of them...and they were so proud of themselves...here's a short video of them in action: 
If only we worked that fast! 
In addition to the video, I spent about an hour in the morning with my super helpful specials team laying out large sheets of paper, setting out the chalk trays and the foam brushes. Last night I cut out 65 fish templates (we'll be painting them for our very last art project of the year!) and had them on the kids' tiles. We always work on the opposite side of the ceiling tile as it takes to the chalk so much better. 
32 chalk trays were ready for the kids to use. Check out that chalk, isn't it beautiful? 
Now, with 65 kids, you know they don't all work at the same pace. So I would share a little of the video and then put them to work. When they finished OR when they heard me ring my chime, they knew they were to stop immediately and meet again on the floor to learn the next steps. 
 Kids who finished early were asked to walk around and see if there were any friends who might like some help with their tile. I wouldn't normally have the kids work on each other's pieces but this is an exception. These tiles are BIG! And some kids wanted the help of their friends. Also, I emphasized that this was a collaborative project so help from our friends was great...but only if the artist wanted it. If not, move on to another friend!
This is our third year with this project and it's a big hit each time. This particular group was so excited about it! We do a different theme each year. Our first year, it was butterflies and least year was flowers. I'm so pleased with these bright and cheer fish, perfect to create a school of fish in our ceiling! 
 I get a lot of questions about this project so I thought I'd address them:

* How do you seal these? After the kids are done, these are sprayed heavily with Aqua Net. It does dull the color but not much...and def not noticeable from the ceiling.

* What does the Fire Marshall think? Our Fire Marshall didn't mention them! And, of course, we didn't ask. 
 * Do the kids get these back? No. I emphasize that the tiles are there to stay, it's our legacy, our magical mark we leave behind.

* How do you get all of the tiles? The first year, my custodian was able to order extra for me. Now, we just use the ones he has taken down. Meaning, when he takes down the clean tiles to hang the fish, we'll use those as our "canvas" next year!
 * How did you convince your administration to allow this project? This project came from a request from my principal! She saw artwork on the ceiling of a school and asked if I could do something like that. At that school, the kids had drawn on paper and the work was tacked to the tile. Originally, when our street painter artist came, we were going to do sidewalk drawings...but rain was in the forecast. Thinking that the texture for the tile would be the same as the sidewalk, the night before, I came up with the idea to do the back of the tiles. We do the back because it takes the chalk much better. 
 * Why chalk and not paint? Personally...I find the surface of the tile to be very porous and just absorbs the paint. This seems to take a lot longer...and I don't always love the look. Chalk, however, works great on the back of the tile and I love the look. 
 * What happens when you run out of ceiling tiles?! Pretty sure that won't happen any time soon. Our school is large and our librarian just asked today if I'd do something for the ceiling in there! Short answer: I'll retire, ha!
* Who hangs the tiles? One of our amazing custodians. He LOVES doing it and seeing what the kids create. I tried to hang them once...it's a rain of chalk dust! He's the best for doing it for the kiddos. 

I think that covers all the questions about this question I've gotten in the past. But if you have others, feel free to drop me a line in the comments!
 Love to know if you've done a project like this before...or any legacy type project. They certainly add a punch of happy to our school. 
I'll be sure to share what they look like once they are installed. Until then, I'll be unloading/loading a kiln, matting artwork, scratching my head over a mural and having a nightmare about the art show. You know, the usual. 
 photo signature_zpsd10b3273.png
Read more »

Tuesday, February 21, 2017

In the Art Room: Introducing the Principles of Art

My first grade students are currently learning about the folk artist Kerri Ambrosino. Here's a sneak peak at their works in progress. As they moved on to the next phase of this project today, I thought it would be a great time to introduce the Principles of Art. We already know the Elements. Here's a video of the simple hand jive I taught the students as well as a sneak peak inside this first grade lesson:
As I've mentioned, I do a lot of call and response, almost too much. But it really helps my ELL students, reinforces vocabulary and, frankly, it's just plain fun. I love hearing my students voices in that video, you can hear each of their fun little personalities. 
Here's a little more on the Elements of Art hand jive. 
My first graders used a similar method to painting and preparing their papers for this collage. You can see more of that process here
Love to hear what fun songs and dances y'all use to reinforce vocabulary in your art room! 
 photo signature_zpsd10b3273.png
Read more »

Thursday, September 8, 2016

In the Art Room: Dot Day Radial Designs by 3rd Grade

Hey, kids! Today I'm sharing with you the follow up to a lesson I shared a coupla weeks ago: Tissue Paper Relief. Because of the delicate nature of these tissue paper reliefs, I knew the kids would need to back them on something. So, after a review of radial balance and design, as well as the elements of art, we created these colorful backgrounds, added our tissue creations to them and, viola! Third grade successfully created their dot designs for Dot Day!  
Aren't they so spectacularly colorful? I swear they practically glow in the dark! In case you missed it, here is the video I created to introduce the kids to radial balance and design as well as the process of making the tissue reliefs:
BIG SHOUT OUT to AOE and Blick for sharing this lesson at the most recent online conference. 
Surprisingly, this project was a quick one. We spent one day creating our tissue reliefs which needed a day (or more) to completely dry before popping out.
Once dry, I popped the designs out as they are pretty delicate and I didn't want the kids to accidentally tear them. The following art class, they were given 10" cardboard rounds. They traced their tissue relief in pencil and then created a radial design in black marker.
I reminded them to keep their designs big because they would be coloring with these bad boys:
So I'm a sucker for all things fluorescent. And so are the kids. I love these Gallery brand oil pastels which you can find in most of your art supply catalogs and Amazon. 
Creating and coloring the design took them just under an hour. Enough time to attach our tissue reliefs to the center and have them ready for a display in the hall! 
What I love about this project is that it reinforced our study of radial balance...
Gave us the chance to work with a variety of art supplies...
And create something really cool! Definitely a project I see myself teaching again in the future. 
I'm not usually a repeat offender when it comes to art projects but for this one, I might have to make an exception.
I know several of you purchased the rubbing plates after hearing about it from AOE. I'd love to see where you take this project!
Until then, have a super bright week, y'all! 

 photo signature_zpsd10b3273.png
Read more »