Teacher Appreciation Week was last week and I FINALLY managed to get the fourth grader's portraits of our faculty and staff up just in time. If you recall, we created these some time ago...but I'd been saving them as a surprise for the teachers and staff on Monday of appreciation week. So I sneaked in on Sunday and got 'em all hung. They were a huge hit! Our theme for our art show is Superheroes...so I thought that calling this The Everyday Superheroes of Johnson Elementary would be fitting. If you recall, I did a similar project to this a couple of years ago and we called it the Gallery of Gratitude. For that, we simply created drawings. This time around, we used modeling clay. More information here.
Here's the video I created for my students (and all y'all) to help them learn the process of creating a portrait with modeling clay:
I got a lot of questions about this project so I'll try to answer them here. *How did the kids pick the person they were to create a portrait of?
I had them silently draw the person's name after the video. If they knew the person, then they could go to their seat and get started. If they did not know the person (maybe they are a newer student or perhaps they simply have not had interaction with that person to know them well), then they could stay seated on the floor. After everyone drew a name, they could chat amongst the other kids on the floor and either swap names or do a redraw.
* What about the people that didn't get their names drawn? Who did their portraits? I had some kids who I learned were VERY fast at creating these mini portraits. And they loved creating them. So for those early finishers, I'd have them create a second or even a third portrait...or help those who were having trouble with their portraits.
* What supplies did you use? Does modeling clay dry? We used modeling clay from the craft stores...I found that some could be hard and some easy to manipulate. If they clay was hard, I simply told the kids to warm it up in their hands (see the video). I really found that all the modeling clay we used worked well. We used matte board cut to 3" squares as our base. Modeling clay NEVER sets so I added a varnish to the top to seal and protect it. For that, I used Crayola's Model Magic Glaze. The "frames" are actually plates from Hobby Lobby!
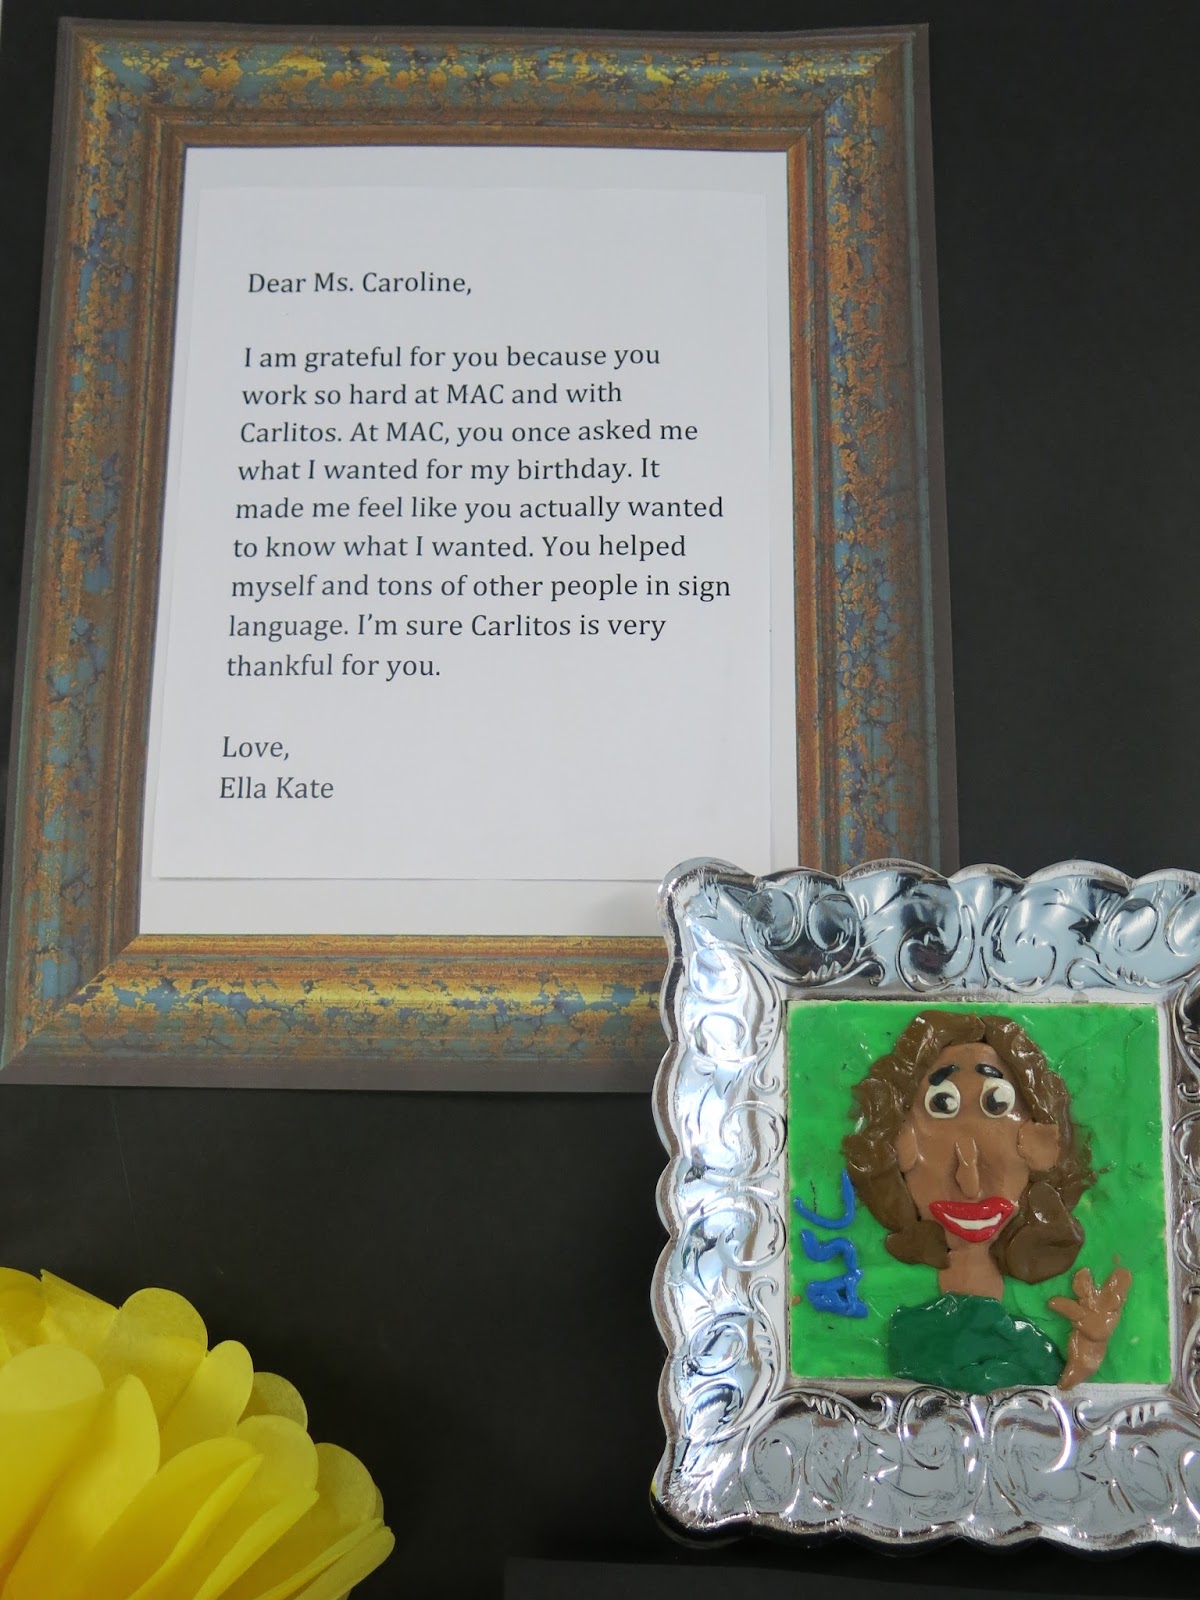
* How did you do the written portion? I didn't...the classroom teacher's handled that for me! I sent them an email letting them know what we were up to and asking if they could help me out. Not only did they talk to the kids about the written portion and have them write it up, they also had them type them! A parent volunteer then added them to the fancy paper frames.
* How long will this stay up? I'd love to leave it up until the start of next school year...but I'm pretty sure I'm going to have to take it down before school's out for the summer. I'll be passing these back to the teachers and staff.
I think that about covers the questions I've been asked. My students loved making these so much that I followed their portraits up with a self portrait project of the same nature. They look so adorable for our art show!
Were there tears on Monday morning? Y'all better believe it! This is one of the most favorite projects that I've done...it means so much to everyone involved!
I loved reading the kind things our students had to say. Each and every person working in my school is so well loved!
I'll definitely be doing this project again. I'd love to hear if you've done something similar!
Hey, y'all! I am so excited with how these kid-created portraits of the faculty and staff at my school are turning out, I thought I'd share. This is just Part 1 of the Gallery of Gratitude posts...I'll be sure and post again once these are on display. In case you missed the first post about our Gallery of Gratitude, you can check it out here. This idea is not a new one at my school...you can see our Gallery of Gratitude from a couple years ago here.
Two of my fourth grade classes got their portraits complete. They did such a great job and I have so much left over modeling clay that I think I'm going to have them create self portraits next week. They've become pros at this and have really loved creating them. Here's the lesson video I created and used:
Here are the supplies we are using: * Modeling or plasticine clay. No one brand is better than another. I have just been purchasing whatever is cheap at the craft store. * Model Magic Glaze. Here's the thing: modeling clay always stays soft. These portraits will be on display for a while in my school...so I knew I'd want them to be protected with a hard varnish. This "glaze" works really well at becoming super hard. I think ModPodge might work pretty good...but this stuff is a lot harder than that. * Plates from Hobby Lobby. So our "frames" are actually plates from Hobby Lobby! You can probably find them online. * Matte board. I cut ours down into 4" squares.
Day #1: It took us some time to cover the entire background, create a skin color and add the head, ears, neck and nose. That took us an hour, believe it or not. Chatting about the project and watching the video took some of the time too.
Day #2: We really made progress. Almost all of the kids finished their portraits...some were super close! I thought I'd share what their works in progress look like.
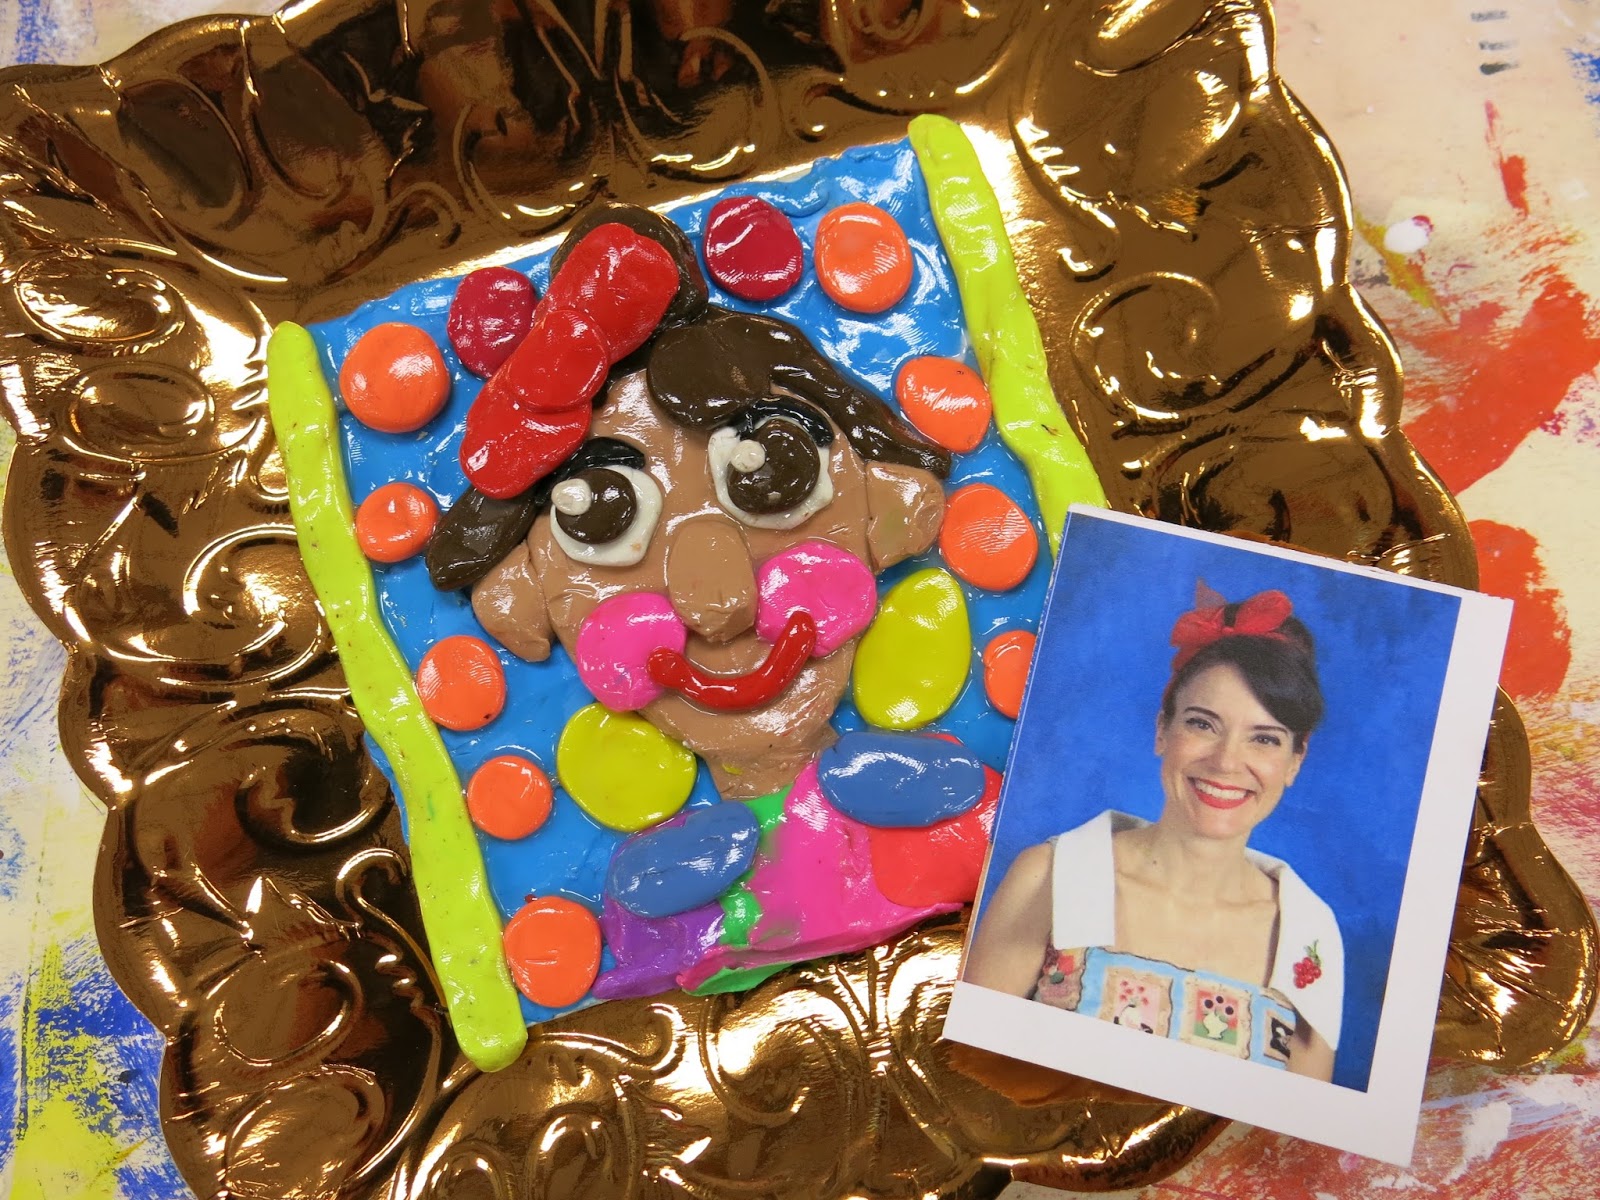
Biggest bit of advice: HAVE PHOTOS! The kids really studied the photos, matching outfits, hairstyles, glasses and more. My sweet buddy the bookkeeper printed off yearbook photos and each student was able to use one as a reference. I plan to hang these photos near the clay creations when on display.
And now, forgive me while I share a ton of these cute clay portraits!
When we take these down, they'll be gifted to the teachers, faculty and staff. The kids will also write a message of gratitude about that person to be hung with their portrait. I'll post about that in Part 2!
In the background, the kids were asked to add something that "said" something about that person. Here's a portrait of a kindergarten teacher.
Those are books behind our library assistant!
And music notes behind our music teacher!
I am loving the giant earrings and the cherries in this portrait.
This teacher plays guitar in his class. The glaze was just put on so it will dry clear, not milky like you see.
One of our custodians is also our school D.J. Here he is, outside on field day with his baseball cap on backwards spinning records.
This background, love!
Incredible attention to detail! This one makes me so happy!
Artistic license was taken with hair color here and I'm loving it. More to come, y'all! I had to share our amazing progress!
After the holidays, with Valentine's Day on our minds, I like to have the kids spread a little love and cheer. I've got lots of lovey-dovey based projects in the works which I'll be sure to share. One project that really spread a whole lotta warm fuzzies was one we did a couple years ago called the Gallery of Gratitude.
You can read all about it here. This project meant so much to the folks I work with. They were stopping in their tracks, reading the words the kids wrote about them, taking pictures, crying...it was AMAZING. We did it right before Thanksgiving to give thanks. I knew I wanted to do the project again this year...but missed the Thanksgiving deadline. So I thought it would be perfect for the winter...when we could all use some warm fuzziness. However, instead of drawing the portraits like we did previously, I decided we'd change it up a bit.
A while back, an art teacher (whose name I don't recall so I cannot give credit to -- so sorry!!) did modeling clay portraits with her kids and they were SO FUN. She shared the the kids looked at the author/illustrator Barbara Reid. Y'all have to check out Barbara's books and videos, so amazing. After watching her videos, I realized just how easy this would be for my fourth grade students. Here are the supplies we are using: * Modeling Clay. The brand does not matter! And the stuff is CHEAP! So much cheaper than Sculpey and full of color. I bought some inexpensive variety packs from the craft store. * Matte board. I used matte board because of the weight of the clay and I wasn't sure if it would warp cardboard. I happen to have a TON of matte board so it came in handy. I cut ours to 4" squares as I wasn't sure if the kids could do large pieces. They could have totally done it! * Model Magic Clear Glaze. The thing is, modeling clay NEVER EVER dries as it's a combo of wax and oil. However, with a thickish layer of the clear glaze on top, it becomes pretty hard. * HOBBY LOBBY METALLIC PLATES! Y'all! I saw these at the Hob Lobs a couple months ago and just about fainted. The perfect fancy frame, right?! *Old school yearbooks. So we could look up the person whose portrait we are making. * Names. These are the names of folks whose portraits we are making. We'll be doing a portrait of every person who works in our school building. Video demo I created for the kiddos:
We started the project yesterday. We spoke a lot about gratitude, what it means, how to show it. Then I had the kids draw a name of a person who works at our school. I told them that if they were happy with the name they got, they could go to their seats and get started. If they didn't know the person and were interested in trading, they could remain on the floor. The kids remaining on the floor shared who they had and traded. A few kids were allowed to redraw a name if they had no clue who the person was...and I knew kids in my other classes would be happy to create that person's portrait. I did have a couple teacher's kids in the class who we all agreed should have first dibs on their parental units. Everyone was happy with who they were creating.
When I share my videos with my kids, I do not show them the entire video. Instead, I break it up into bits. For example, before we drew names, I had the kids watch the first part of the video about covering the background. Then we drew names and set to work. Thankfully, my heat was working and my art room was SUPER warm. This really helped with the manipulation of the clay. In the video, you'll notices I struggle a little because my heat was not working on the clay was super cold and hard. So crank up that heat for this lesson!
After completing the background, the kids came to the floor and we each announced which person we were creating a portrait of. That was fun and the kids were so excited. This is their last year at my school so many of them shared memories of the person whose portrait they are creating. We then watched the second phase of the video about creating a skin tone and creating the basic shape of the head, neck, ears and nose.
I will say this, a couple of kids made their head shapes super small. So I had those who "got it" go around and help make the heads a little bigger. For my next class, I'm going to have a head shape created out of paper and request that the kids place their clay on top and stretch it to that size...I think this will help make the heads bigger and more consistent in size.
I made sure to write down whose portrait was spoken for so that I could keep track of who we were creating and who still needed a portrait made. We might end up having a handful of extra teachers and staff...and I'll put my early finishers on those.
Here is my teacher example! I'll be certain to share our progress with y'all!
Sometimes I do believe I am my own worst enemy. Despite the fact that the Monochromatic Self-Portrait mural is not up (and by "not up", I mean I've yet to even mount it!), I decided to plan another collaborative piece for the kids. Crazy? Def. Nobody ever said teaching art was for the sane. Y'all might recall that my theme this year is kindness which I believe begins with a love for oneself. After all, you cannot be a loving person without loving Numero Uno, right? And that's what I really love about You Be You by Linda Kranz.
It's a beautifully colorful book (where the fish are actually painted on rocks!). Not only do I love the message and the illustrations but I love that I can (re)introduce my students to the elements of art with this fun lesson. Originally I was only going to do this project with my third grade. However, it was such a hit with them (and such a fast project), I decided to have second (and possibly firsties!) create a fish as well. The more fish the better our collaborative mural, says the crazy art teacher. Here is the instructional video I shared with my students:
Feel free to use it in your art room! My students had idea sheets on their tables that really let them explore a variety of possibilities.
I encouraged them to come up with their own ideas. They are used to having "idea sheets" on their tables for inspiration. And, since there were a lot of directions given, I also provided a review of the steps on the tables as well...
In the video, I used oil pastels because that was all I had on hand at home. However, my school oil pastels are down to stubs so I gave the kids construction paper crayons to use. My third graders whizzed thru their drawing and coloring so fast that I decided to bust out the puffy paint because...PUFFY PAINT RULES.
These took us our entire hour with a little time left over to check out everyone's fish. Next up: painting the large mural that the fish will be placed in! I'll definitely share a follow up post as we work on that in the next week.
By the way, if you are curious about the circles the kids painted on...they were painted by first grade! First grade is wrapping up a dreamcatcher project where they had to use a paper plate (details on THAT project in tomorrow's Art Teacherin' 101 titled WHAT NOT TO TEACH IN THE ART ROOM. Spoiler Alert: it's dream catchers). The first grade painted paper plates and then the center was cut out to make room for their 'catcher. Instead of recycling them, I decided to have the kids use them for this project!
Let's talk about how cute and original these fish are, can we? This boy LOVED that his fish looked just like him, complete with glasses and missing teeth.
And this new student really surprised me with his level of detail. I thought for sure he'd color over all of his lines. I was happy to see that he took the time to color each section. This project served as a great assessment tool.
This project was so fun that I'm thinking of having the kids do a follow-up project that involves them painting their own rock a la Linda Kranz.
By the way, I know I recently shared my I Can board on instagram and had some inquiries...here's a close up. I don't get too specific on my board because I ain't got time for that. I do find it's helpful both for me and the students to have this visual. By the way, the pencil and the notebook came courtesy of the Target Dollar Spot. I just used black acrylic to paint the grade level and puffy paint (again, because PUFFY PAINT RULES!) on the felt notebook paper.
And there you have it, You Be YOU! Stay tuned for our completed mural...and be sure to pop by tomorrow for Art Teacherin' 101.