Showing posts with label winter art class. Show all posts

Sunday, January 7, 2024

My 12 Favorite Winter Art Lessons!


Need some fun winter art lessons? Here ya go!

Greetings, art teacherin' and art-lovin' friends!

I got such a wonderful response from my last blog post where I shared my 25 Favorite Lessons for Valentine's Day that I thought I'd continue to share. 

Today I'm sharing with you my very favorite WINTER lessons! Around here, we are just now experiencing the cooler temps with winter on the horizon. What better time to incorporate it into your art teacherin' world?

So I present to you my favorite winter lessons, ALL FREE! Just tap the link listed with each lesson and you'll find a kid-friendly video, handouts and lessons. Feel free to use in your art room but, please, be sure and give credit if you decide to post on social media. AND, of course, please do not repackage my lessons and sell on TPT. I know what you are thinking, "Cassie, people do that?!" 

YESSSS! All the time! SMH.

Anyway, let's get started!
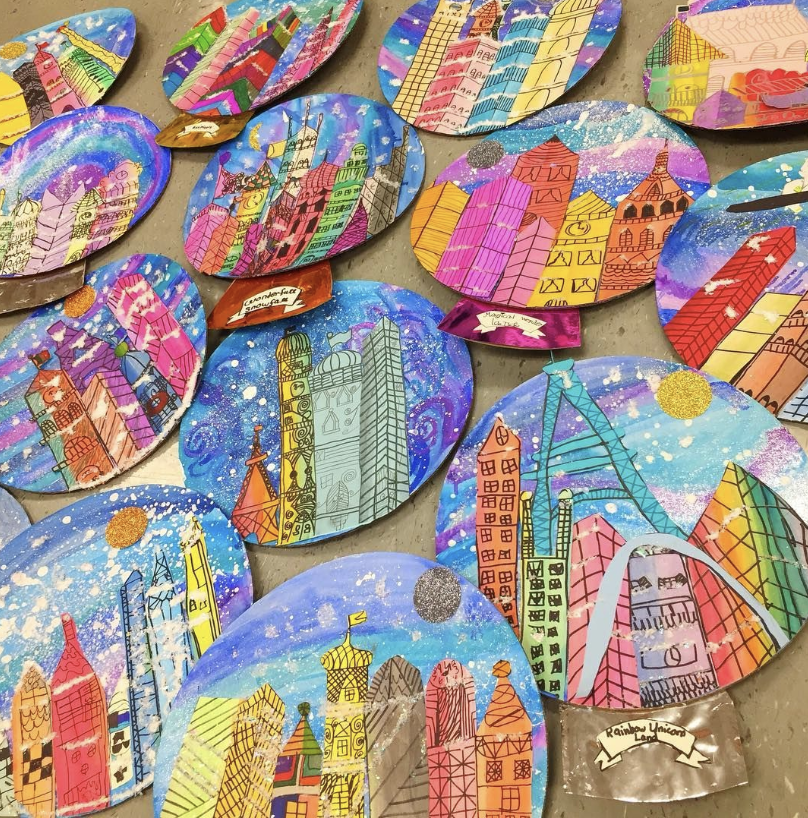
If you are looking for one of those lessons that, let me be honest, takes a while (sometimes those can be a good thing!) this Snow Globes is for you! The kids do love it! Drawing buildings is their favorite part but we also do a lot of painting and, despite my custodian's protests, we do bust out the glitter. Here's the full lesson with video!
This lesson could totally be shortened with less painting! We painted these papers to draw on but you could always use colorful construction paper or copy paper to eliminate that step.
One of my most popular lessons both with teachers and students is the one inspired by Jen Aranyi! Just tap the link and you'll find a video as well as a handout! 

You'll notice we are working on cardboard circles here...one of my very favorite surfaces! You can buy cardboard circles at your local food supplier. I get mine at Gordon Food Services (GFS) where they sell them in a variety of sizes. I like the brand Circle King.
Ya know how "you live and you learn"? Well...after having done this lesson and others involving "black glue", I'm going to share with you a different and much easier way to get the effect of black glue without making it! 


So, don't make black glue. Seriously. Unless you hate yourself and have more time than you know what to do with. Because, honestly, it's the worst and there is a MUCH better way!

When doing this lesson, for example, have students draw their trees with black washable markers. I prefer Prang markers (always! Trust me!). Then, using ELMER'S GLUE ALL (never EVER School Glue), have students trace over their black lines. Overnight, the waterbased marker and the glue will mix and mingle and create...a black glue line! Don't believe me? Check out this blog post and video where I share the process. 
So I've shared with you some lessons I've done with my older kids so let's now focus on kindergarten and first. Here's a lesson I did many years in a row! I love it because it teachers value. Students create tints for the snow and shade for the sky. We also practice our cutting skills with collage. Full lesson here.
Okay, kindergarten!
Another super popular winter lesson (and one that the kids love) is this Winter Penguin lesson I did with my first graders. All the details can be found, including a video, here. 
We kick things off with a painting review as well as warm an cool colors. The first graders painted the warm color papers while the kinder did the cool for their lesson, details below. We talked A LOT about holding our paintbrush and brush control. 
Using one of my favorite art supplies: the bingo dauber; we created these penguins! Again, the lesson has all the details so be sure and check it out!
And here's some kindergarten cuteness! Same method as the first grade project except we did snowmen instead. Full lesson with video here. 
We used chalk after drawing our snowmen to add the pops of color. 
Got that one class that's ahead of the rest and you need a one day lesson for? Well, here ya go!
Looking to dip your toes into some printmaking? This one is always a hit with my second graders. No printing ink? No problem! Tap the link and I'll show you how to do printmaking with markers!
Such a fun way to create winter selfies!
Don't you love a fast and effective art lesson?!
One of my favorite all time lessons is for kids to create their own mugs and drink hot chocolate out of them! For all of THOSE details, just tap here!
Speaking of printmaking: if you have Gelli Plates and have been dying to bust them out, here's your sign. And your lesson!
Now we took ours a step further by printing on fabric and stitching the into banners but...let's be real: how many of us have sewing machines?! So you can try it with a small group or just enjoy the printmaking process!
Tis the season to remember just how important collaborations in art can be! For that reason, why not try a big ole winter collaboration on for size?!
Look how colorful and fun!

What to do with all of those paper snowflakes you teach the kids how to make? Try THIS project on for size! Faux metal tooling with fourth grade -- stunning!

Thanks for checking out this post on my very favorite winter lessons! In case you haven't heard, I've written two new books and have self-published! You can take a closer look and find them both here. 

Thank you as always for all of the support, y'all!

photo signature_zpsd10b3273.png
Read more »

Sunday, January 12, 2020

In the Art Room: Heather Galler-Inspired Hot Chocolate Paintings, Part 1


Hey, y'all! I started a new lesson with my first graders this week. They are really enjoying it and I thought your students might as well. So I quickly created a lesson video for you, if you are interested. In my art class, we learned more about the artist Heather Galler and looked at her work, her love of pattern, color and bold line designs. Afterward, we spent our first thirty-minute art class sketching together in our sketchbooks in preparation for the following day's painting. 

The next day, we sat on the floor (see last photo) and, using an ink-filled bingo dauber, we drew these masterpieces together. No pencils first, we just dove right in. My students were excited by the results and I can't wait to see how they go about adding color with oil pastels and watercolor paint. 

Here is a quick lesson video I created for you and your students if you are interested!
And here's me hanging out with a class of first grade masterpieces. I didn't intend to match their work but when one of them pointed it out to me, I had to laugh. I do love me some black and white! 

 photo signature_zpsd10b3273.png
Read more »

Tuesday, December 23, 2014

In the Art Room: 4th Grade Snowflakes

So this lil repousse snowflake by my fourth graders just might be the fastest art project we bust out this year. Not that I'm bragging. I do believe those canvases coulda used a lil more work. However, I needed something short, simple and fun after our super long Mexican Sun/Moon weavings and this did the trick nicely. 
Just like this third grade paper cutting project, we discussed Mexico and the art of papel picado. I stumbled upon a couple of prezies on the art form which was great to share with the kids. I also have several examples of papel picado hanging in the art room so they could get the idea. So our first course of action: Cut some paper designs (I hesitate to call these "snowflakes" as they don't exactly meet the criteria but whateves).
Once the kids' designs were cut, they brought them to me where I placed them on a piece of 5" square matte board that I'd ready cut and doused in spray adhesive. Another hit of spray adhesive and a piece of 7" square aluminum foil was placed atop. The kids were instructed to return to their seats, fold the excess foil to the back and massage the surface with their finger tips only (no nails, y'all) until their design appeared. With the long winded chat and all that work, this took us about an hour.
In preparation for the following class, I'd spray painted each of the boards very lightly with the cheapest spray paint I could find (the dollar a can stuff from Home Depot is my jam). When the kids arrived, they were instructed to use 000 steel wool to burnish off the spray paint. They were thrilled when their design started to appear. That took them no more than 7 minutes. If this process looks vaguely familiar, I've done it with leaves as well. If you follow this link, you'll get a better glimpse at the step by step process. 
From there, the kids were each given a 6" square canvas. They traced the placement of their piece (I showed them an example of a diamond placement or a square. Guess which one was more popular?) and then commenced painting. I limited their palette to the cold colors (these are kinda sorta snowflakes, y'all. So we went with a winter palette for that reason). The only instructions I gave was a reminder to clean that brush between color switching and to keep the painting abstract (lines, shapes and color). The last 30 minutes of the second art class were spent quietly painting these canvases. Once dry, I added a touch of hot glue to the back of the repousse and attached. Boom! Done! Ready for hall display.
And now, on to the giveaway! Check out this huge pile of packages that I took to the post today. I hope y'all have been enjoying this giveaway as much as I have. It's been super fun. And, to be honest, what I've loved the most is reading all of your comments. So often, it's hard to leave comments on a blog or, quiet honestly, it's just easier not to (I'm very guilty of this so I totally get it). Which means, at times, I feel like I'm talking to myself because I don't often hear from y'all. So having this exchange with you has really meant a lot to me, thank you so very much for playing along. 

So, what's up for grabbies today...?
All sorts of glorious vintage goodness! Two lovely vintage alteration booklets, two packets of vintage buttons, a little needle booklet and an iron-on embroidery pattern set. So many pretties in one giveaway, ya'll! Vintage-lovers, this is right up your alley!

Here's how you can enter to win...

1. So, it turns out that A LOT of y'all want that needle felting kit! My question to you is...if I were to sell them, would you be interested? Would there be any other artsy kits you'd be interested in?

2. Don't forget to add that email address, kids. Tomorrow is THE LAST of the giveaway goodness, eeee!

And the winner of that needle felting kit?! Tracy Evans! Congrats, buddy!

 photo signature_zpsd10b3273.png
Read more »