Sunday, September 11, 2016

In the Art Room: Clean Up, the Movie!

 
Hey, guys, Box o' Crayons here! I'm so excited to share with y'all a little something I've been referring to as Clean Up, The Movie. It has been brought to my attention that my wee artists have kinda forgotten our clean up routine (cuz their art teacher foolishly assumed that they'd remember it as we were only out of school for two months and they are under the age of 10 [I know, I know. When will I learn]). Because I covered it quickly at the start of the year, I failed to really drive home the important parts of our routine. So I recruited my awesome buddies Kiera Crite, our music teacher, Ali Starkweather, our P.E. teacher and Bethany Kokoski, our P.E. teacher, to help a crazy art teacher out. 

Grab your popcorn, folks! And enjoy Clean Up, The Movie
I got the idea to create the movie earlier this week, wrote out the "script" (if that's what you wanna call it...been over-sharing all the deets here) Thursday night and we filmed on Friday after school. I strongly encouraged the ladies to do a little improv because they are so funny, I knew they would come up with some great stuff. And I know that the kids are going to LOVE seeing some of their favorite teachers ham it up in this video! Be sure to watch to the end where I threw in our outrageous outtakes.
Here's what I decided to cover in the art room:

* Clean Up Signal I once casually mentioned that I thought it would be cool to have a gong in my art room after seeing one at a music shop. My hubs works for a musical instrument company and, well, I magically received one for our 10 year wedding anniversary. The kids love the Clean Up Gong (tho it has been accidentally referred to as the Clean Up Bong and the Clean Up Dong...oh boy). Before I had the gong, I used this chime from my husbands company. I love using this inexpensive chime as an attention getter. 

* How to Clean Up Essentially, the kids need to know that they are to make the room as tidy as they found it (or better!). My older students totally get it, they are actually really great at straightening and tidying up. I have noticed that my younger kids don't even seem to see that they left scissors out or their chair not pushed in. I don't know if it's because they are young and mama picks up after them or what. But the words, "I am not your mama!" may have come outta my mouth a time or two.

* Standing like a Statue Their signal to me that they are ready to roll is that they are standing silently behind their pushed in chair at a tidy table. To encourage them to work together and clean up, the "best" table gets to line up first. Which is really bogus as they all have their certain spots in line. 

* Alphabetical Order Okay, you might think this one is crazy but it's the best thing ever. My students either leave my room and go to P.E. or vice versa as they have P.E. every day at my school. For our total Special Area sanity, we have the kids line up in designated spots so we don't have to deal with "But I'm the Line Leader!" "I'm the Door Holder!" "I'm the Caboose!" We ain't got time for that. Our fabulous P.E. teachers teach them how to line up in alphabetical order so when they come to me, they already know their spot!
* Painting Clean Up I must get asked a bazillion times, "where do I put my painting?" My response is usually "really?!" Or, even better, when they bring the painting to ME and I'm all, "do I look like a drying rack?" I totally forgot to put in the video where to put the paint brushes but the kids are really good at remembering where to put those (in a large plastic coffee can filled with warm soapy water by the sink). 
Weren't the actors hilarious?! We were DYING in between takes, y'all. I'm so lucky I work with folks who are willing to join me in my crazy ideas. BIG THANK YOU, Kiera, Ali and Bethany! I can't wait for our next movie making adventure. 
In case y'all are interested in how I created and edited the video (and did the voice over on the prezi), you might want to watch the above video. I'm SUPER low-tech...so if I can do it, you can!
While the making of the movie didn't take us long, the editing was a bit of a beast. Splicing all of those clips, trimming them down, creating the Prezi at the end and doing that voice over...it was a labor of love. I think I'll be able to use it for several classes and years. And I can always edit it some more in iMovie if needed. 
I'll keep you posted on the kids' reaction to Clean Up, The Movie!
 photo signature_zpsd10b3273.png

Thursday, September 8, 2016

In the Art Room: Dot Day Radial Designs by 3rd Grade

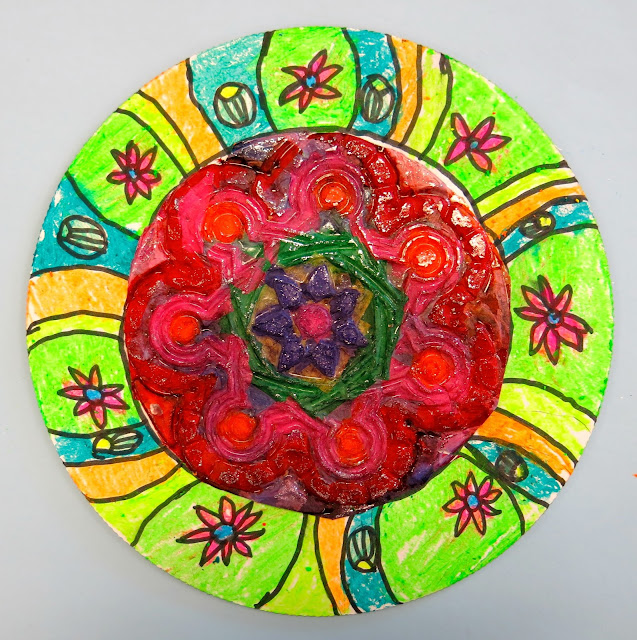
Hey, kids! Today I'm sharing with you the follow up to a lesson I shared a coupla weeks ago: Tissue Paper Relief. Because of the delicate nature of these tissue paper reliefs, I knew the kids would need to back them on something. So, after a review of radial balance and design, as well as the elements of art, we created these colorful backgrounds, added our tissue creations to them and, viola! Third grade successfully created their dot designs for Dot Day!  
Aren't they so spectacularly colorful? I swear they practically glow in the dark! In case you missed it, here is the video I created to introduce the kids to radial balance and design as well as the process of making the tissue reliefs:
BIG SHOUT OUT to AOE and Blick for sharing this lesson at the most recent online conference. 
Surprisingly, this project was a quick one. We spent one day creating our tissue reliefs which needed a day (or more) to completely dry before popping out.
Once dry, I popped the designs out as they are pretty delicate and I didn't want the kids to accidentally tear them. The following art class, they were given 10" cardboard rounds. They traced their tissue relief in pencil and then created a radial design in black marker.
I reminded them to keep their designs big because they would be coloring with these bad boys:
So I'm a sucker for all things fluorescent. And so are the kids. I love these Gallery brand oil pastels which you can find in most of your art supply catalogs and Amazon. 
Creating and coloring the design took them just under an hour. Enough time to attach our tissue reliefs to the center and have them ready for a display in the hall! 
What I love about this project is that it reinforced our study of radial balance...
Gave us the chance to work with a variety of art supplies...
And create something really cool! Definitely a project I see myself teaching again in the future. 
I'm not usually a repeat offender when it comes to art projects but for this one, I might have to make an exception.
I know several of you purchased the rubbing plates after hearing about it from AOE. I'd love to see where you take this project!
Until then, have a super bright week, y'all! 

 photo signature_zpsd10b3273.png

Tuesday, September 6, 2016

In the Art Room: A Fiber-tastic Twitter Chat!

Hey, favorite friends! I'm super stoked to share with y'all that I'll be hosting a Twitter chat tomorrow in conjunction with the Wisconsin Art Education Association. If you've never joined the fun of a Twitter chat, here are a couple of things you should know:

*  To join the chat, simply search #wiartchat in the search bar. Starting at 8pm, you'll see the chatter starting with questions by me about all things fiber. 

* To add to the conversation, begin your tweet with the hashtag and an A for answer the number of the question you are responding to. For example, "#wiartchat A1: Yes, fiber arts is in my curriculum!" 

* Know your abbreviations. Because of the limited amount of characters, folks will often respond with abbreviations which can be a little confusing. Just think of it like reading a text and the shortened words will make sense. 

* Hold on to your seats: these chats are often only 30 minutes in length. With a half dozen questions and a bunch of folks responding, it can get VERY busy. My first time joining in on a chat involved me just taking it all in. Relax and enjoy the ride.

Now, let's talk about what all the tweeting will entail:
I'll be resharing the questions during the chat so no need to put them to memory. I hope to chat with y'all tomorrow night, it will be so fun!

Of course, I'm thrilled to be chatting with my buddies in Wisconsin as I'll be there for their fall conference leading a fiber class and talking it up in LaCrosse on October 20th - 21st. You can find out more details and register to attend here
 And, since we are talking all things fiber-tastic...
Just a reminder that I'm teaching a fibers course over on AOE. Remember, if you use the code SAVE10CASSIEART17, you'll get a 10% discount!
So looking forward to chatting with all y'all real soon! 

 photo signature_zpsd10b3273.png

Monday, September 5, 2016

In the Art Room: Monochromatic Selfie Mural

Oh, y'all. Murals. Every time I have the kids create the pieces for one I think to myself: THIS HAS GOT TO END. The crawling on the floor, the hot glue burns, the accidental stapling of flesh (in my thigh? For real tho?). Then I hang it up and immediately forget the pain and suffering. I just stand back and absorb the awesomeness that is the work of my wee artists. 
Like awww, y'all. These selfies created by my first through fourth grade students (with about a dozen missing as they still have some finishing up to do) are just about the best thing ever. And it already has me plotting and planning our next collaborative project. Because I'm a glutton for punishment. 
In case you missed it, we started our school year with a monochromatic self-portrait project. You can see the finer details here. The above is the video that I shared with the kids. 
And here is a look-see as to my set up. The covered tables signify the colors available at that table. The kids could use any ONE color they wanted (which meant for that first day, they sat where they liked) but if a table was filled up, then move along, Little Doggie. On the tables there were two bins filled with markers and colored pencils of one color in a range of values. There were also mirrors on each table. 
At the end of the first week, I had a stockpile of these lovelies that I organized by color. Initially I was going to do something COMPLETELY different with these selfies. However, tried as I might to make the idea work (I was going to make a big ole peace sign), it just wasn't coming together. So I shelved the idea, allowed myself to let it go and I flipped my flop... 
And went with this idea instead: The Many Faces of J.E.S. 
Our students have a STONG sense of school pride. They are happy kids who truly love their school. Our school colors are yellow and blue. I think they are gonna totally dig this mural when they see it tomorrow!
But, like I said, the gluing, mounting, plotting and planning is what completely wears me out. I did this on a Sunday just so I could knock it out with plenty of uninterrupted time. And so no child could witness giant extension cords and hot glue guns on the ground. Is it any wonder why I am so accident prone? I set myself up for disaster. I truly am my own biggest enemy!
Next up: kindergarten still needs to create selfies. AND I had the posters that the kids created in this post laminated. I can't wait to hang them up alongside this mammoth masterpiece. 
I'm also stoked that this is up two whole weeks before Open House! Now I just gotta get three grade levels of Dot Day artwork up...whew. That outta be a good time. 
In the meantime, I'll just be hanging out with some colorful kids.
Who are so uniquely different. I love seeing the variety of creativity!
By the way...I may be a little spotty this week as I'm having a ROOT CANAL tomorrow. Be thinkin' of me y'all. And floss. A lot.
 photo signature_zpsd10b3273.png

Thursday, September 1, 2016

In the Art Room: Radial Design Printmaking

I love art teachers because they have the best ideas and are super sweet about sharing them. This idea comes courtesy of art teacher Jeanna Pena (who you can follow on Facebook and Twitter for all of her art adventures). When she shared this lesson in the Art Teachers Facebook group, I immediately decided to scrap the lesson I had planned for my fourth grader's Dot Day project and go with this one. And I'm so glad I did. It was such a smash hit of a lesson (with still one more round to go as we'll be covering these printing plates and burnishing them next week, a la this project) that I just can't thank Jeanna enough for sharing. So, with her permission, I'm sharing my version of her lesson here!

But first, a word about Jeanna. She's pretty stinkin' awesome. I noticed from a wee bit of Facebook stalking that she seemed to be quite the adventurer. Here's what she had to say: I came up with this idea after I traveled to Cuba last fall. I was attempting to translate the radial tile patterns that I saw in some amazing old buildings.

I applied for the Grosvenor Teacher Fellowship with National Geographic and Lindblad Expeditions and it has been a whirlwind! They are sending me to Antarctica in December. They brought our group together in DC and we had photography lessons at NatGeo HQ, naturalist updates, and classes with the Google Educational Engagement folks. I'm the only art teacher. They're looking for adversity in content areas! I highly recommend it!

How awesome is Jeanna?! If you have a moment to show her some love in the comments for this awesome lesson, please do so. AND if you have any questions about her travels, you can find her on those social media links above.
Now, let's talk about this project. It was our first for the new school year, right after we wrapped the Escape Game and the Monochromatic Selfies. Jeanna had mentioned she did this project with her older students...so I wasn't sure how my kids would do being brand new fourth graders and all. But they knocked it out of the park! Here is the video they viewed on the first day.
Supplies:

* Cardboard. We used cardboard rounds because of our Dot Day focus which were purchased from Amazon. However, any cardboard or mat board would work. 
* Foam Sheets and/or Shapes with Adhesive Back. I found that Michael's had the best selection where Joann's fell short. I did purchase foam sheets because I knew some kids would want to explore creating their own shapes. Some foam sheets were not adhesive backed so the kids glued them on. Those we found did not stick super well when it came to printmaking. When they came off, I just had the kids bring their board to me and I hot glued them back on.
If you follow me on Insta then you've seen our progress. I had my early finishers recreate their design on scratch paper (also purchased via Amazon) and write about what they learned. 
The following art class, we printed! And, with about 35 fourth graders in the room it was, well, busy. We'll just call it busy.
* Printing Ink. Y'all. ALWAYS buy water soluble Speedball. I have had the same jars of ink forever. I just keep adding water, stirring and it still works great. Unlike the "house" brands that the art supply vendors sell which harden in the tube. 

* Inking Trays. You can purchase these through your art supply vendor. However, with this many kids, I did run out so I simply cut my Gelli Arts plastic containers in half and used those. I'm sure something could be found at the Dollar Tree for this item.

* Paint. We used tempra paint for rolling on texture/color on the background.

* Brayers. I happened to have one per kid so there was no wait time. 

* Paper. We  used 14" squares that I had cut down from large paper. 
Day two's video: honest speaking, I didn't show the entire start of the video to my second group of fourth graders. Knowing that they are a group that likes to move, I knew I'd need to get them working right away. So I started the video just before the demo portion. 
And then they went to work! They had a BLAST.
And the prints turned out so colorful and fun just like the artists. 
A little "before" action. Don't ask me what the aftermath looked like. I've blocked it out.
I had a couple of kids double stack their shapes which I wasn't sure just how that was going to turn out...but I really dig it. Check out the triangles. 
I can really see so much potential with this printing project: a lesson on architecture, a portrait project, floral creations...the possibilities are endless!
Yeah, ya did.
For now I'm just gonna keep taking them off the drying rack and saying Ooooooh and Aaaaaah. Stay tuned for what happens next with these beauties.
 photo signature_zpsd10b3273.png